Fly the Lunar Module over the real Moon
This tutorial walks you through the 3D mode of the game, where you fly the Apollo Lunar Module (LM), from your first look at the screen to landing on an Apollo site. After that come choosing your own orbit, the orbit planner, the fuel override, and docking with a refuel tanker. Every number here comes from the game's own physics.
Keys are shown as W, gamepad buttons as LB. "Back menu" on the gamepad means: press Back, then pick the item with the D-pad and A. On the gamepad, LB / RB are the left and right bumpers, LT / RT the triggers, and L3 / R3 a press on the left or right stick. Click any screenshot to enlarge it. Terms and acronyms are explained in the glossary.
1Getting started
Build, launch, pick a landing zone.
From the godot/ folder, the run script builds the C# code and starts the game:
cd godot
./run.sh                      # main menu: choose 3D, then a landing zone
./run.sh --mode 3d            # straight into 3D
./run.sh --mode 3d --scenario final   # practice the last 1.5 km
There are three starts. F9 cycles them in flight, and F1–F6 restart at Apollo 11, 12, 14, 15, 16 or 17.
| Start | Where you are | Good for |
|---|---|---|
| pdi (default) | Short for Powered Descent Initiation (PDI): the moment on Apollo when the descent engine lit for the landing. You are 15 km up, about 480 km before the site, already on the descent orbit, and the braking cue counts down to ignition. | Your first full landing |
| orbit | A round 100 km orbit, on the far side, 240° from the site | Deorbit burns, the planner, the tanker |
| final | 1.5 km up, 2 km from the site, coming down at 20 m/s | Practising touchdowns |
2Reading the screen
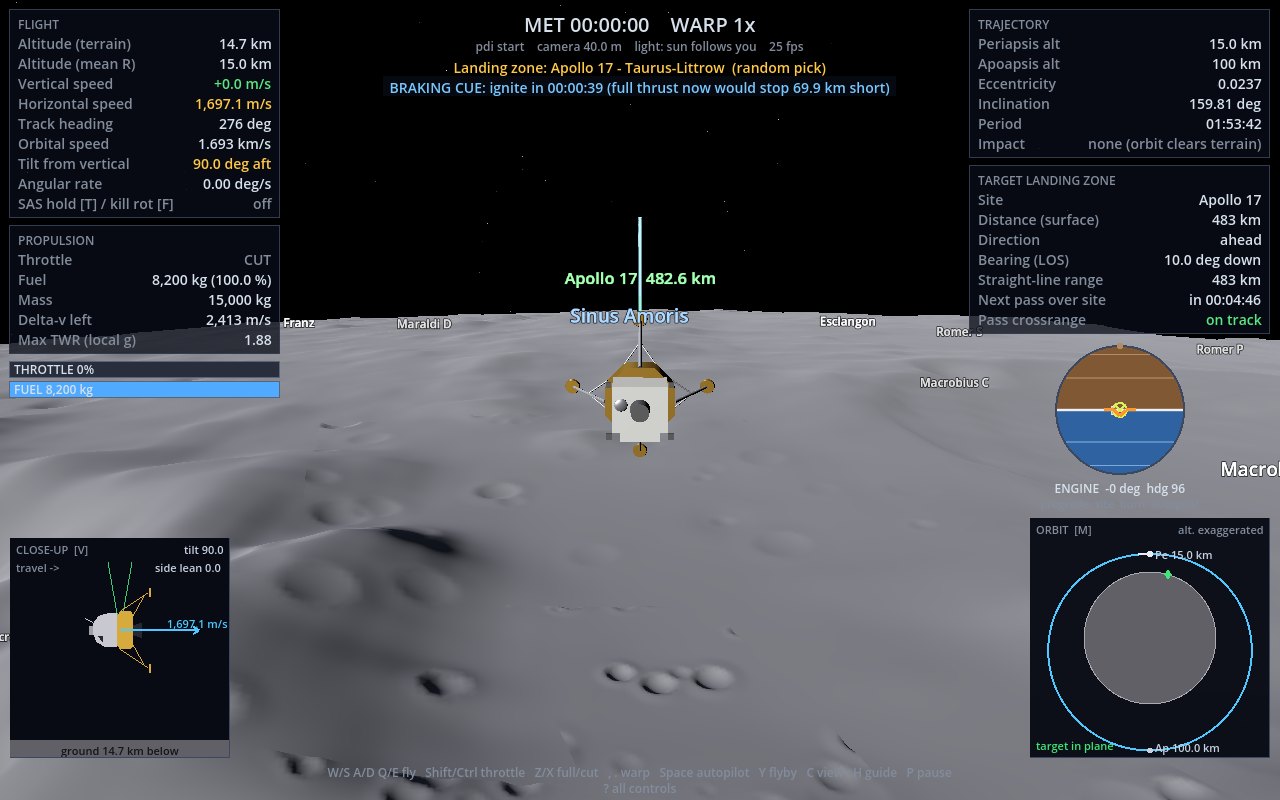
The chase view and its heads-up display (HUD) at the pdi (Powered Descent Initiation) start. Hover over or tap a number to see what it is.
3Flying the LM
You turn the Lunar Module (LM) with small jets, and the one big engine pushes along its "up" axis.
The LM has no wings and no rudder. The RCS jets (reaction control system: 16 small thrusters in four groups of four) turn it, and the descent engine pushes out of its bottom, so wherever the top points is where the thrust goes. Flying is two jobs: point the engine, then decide how hard to push.
Turning
W/S pitch · L-stick up/down
A/D yaw · LB / RB
Q/E roll · L-stick left/right
Let go and the LM stops turning and holds its attitude
F kill rotation · X
Engine and time
Shift/Ctrl throttle up / down · RT / LT
Z full · X cut · A / B
,/. time warp · D-pad left/right
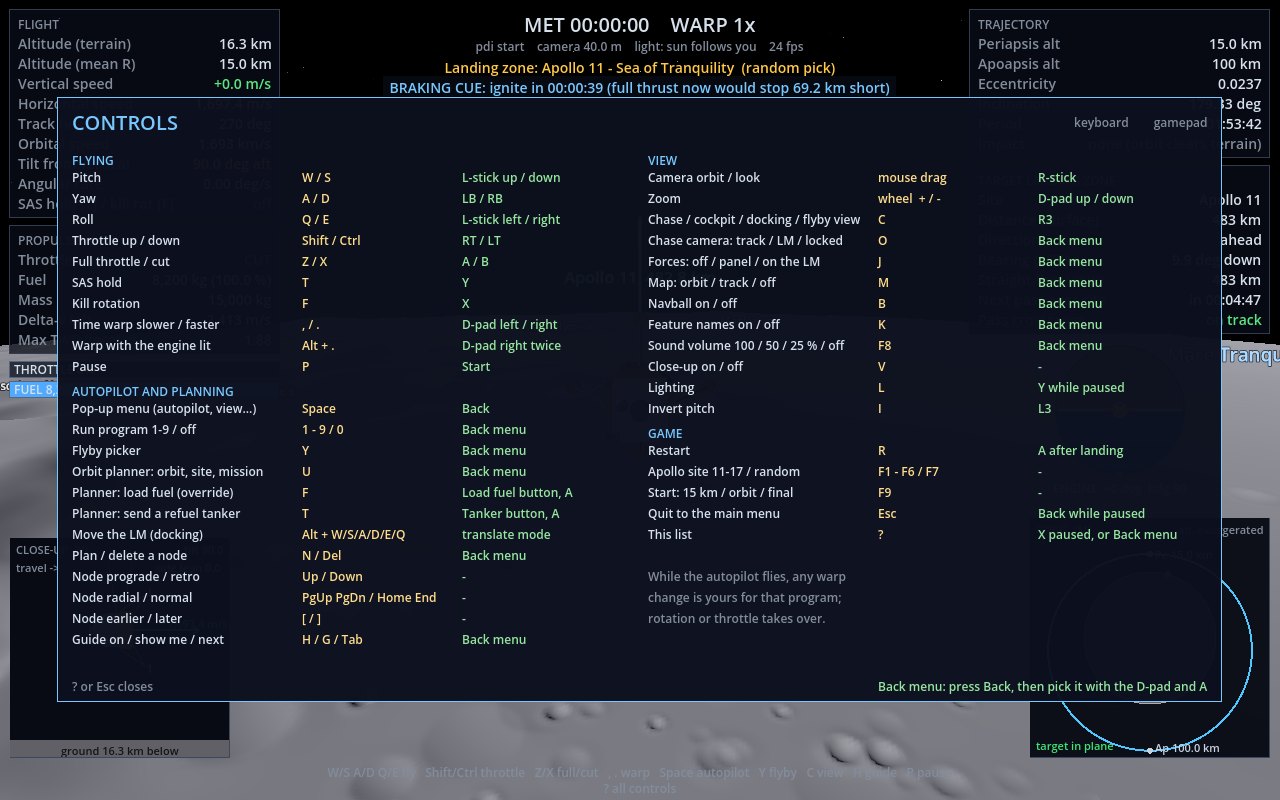
P pause · Start ? all controls
Prefer the spacecraft feel, where the LM keeps turning until you stop it? Pick Switch stick mode in the menu (Space, or Back). In that mode T / Y turns on SAS (stability augmentation system), which damps the turning.
Seeing what the LM is doing
Lock the camera with ; or L3 (press the left stick). The view then stays put: it stops turning with your track, and the right stick and mouse no longer swing it round (zoom still works). The FLIGHT panel says Camera LOCKED. Press it again to unlock.
Force display (J, or the menu) steps through off, a FORCES panel, and the panel plus force arrows in the 3D view: the engine's push in orange, gravity (less the lift your orbital speed gives) in violet, and their sum in white, which is the way your velocity is changing. In the chase view they grow out of the LM; in the cockpit view they sit out in front of the window, pointing the same ways. An arrow pointing straight at you or away from you shows as a short stub or a dot.
Altimeter bar. Below 2 km over the ground a tall bar comes up to the left of the LM, filled up to your height. Its scale squeezes the top and stretches the bottom, so the last 100 m take up half the bar. A pointer gives the number; under the bar is your vertical speed, green when it is slow enough to land, and how many seconds until you reach the ground at that speed.
Axis gauges (', or the menu) draw the LM's own three axes through it: right, up out of the top and forward out of the front windows. Along each one, an arrow shows how fast the LM is moving that way over the ground (for example "down 2.1 m/s"), and an orange arrow shows a push and the side it comes from: the descent engine pushes from below, and the RCS translation jets from whichever side fires. Pushes are in kN (kilonewtons).
Time warp
Orbits take about two hours, so most of a mission is coasting. Warp with . (up to thousands of times in a coast), and , to slow down. Warp is refused while the engine burns. Press it twice (or Alt+.) to warp anyway, up to 100×. The physics still runs every 1/120 s, so warp never changes the result.
4Orbits in four ideas
Everything about getting down, and about the tanker later, follows from these.
1 · You are falling, sideways
At 100 km you move at 1,634 m/s. You fall toward the Moon all the time, but you move sideways so fast that the ground curves away beneath you. That is an orbit.
2 · Burns change the other side
A burn backward (retrograde) lowers the far side of the orbit, half a lap later. A burn forward (prograde) raises it. The point where you burned stays where it was.
3 · Lower means faster laps
A lower orbit is shorter and faster: a 60 km orbit takes 1 h 54 min, 100 km takes 1 h 58 min. This is how you catch up with the tanker later: to go faster, you first slow down.
4 · The Moon turns underneath
The Moon turns once in 27.3 days, so each lap the ground track shifts west. A site that was under your path drifts off it, and an ALIGN PLANE burn (sideways, "normal") swings the orbit back over it.
The TRAJECTORY panel shows the result live: Periapsis is the low point, Apoapsis the high point. If the periapsis goes below the ground, the panel shows Impact in and where you would come down against the target.
5Landing
From the pdi (Powered Descent Initiation) start: brake, pitch up, come down gently on the site.
- Wait for the braking cue. The blue line under the time says BRAKING CUE: ignite in 00:00:39. Warp until it is close, then drop back to 1× warp.
- Brake hard. At the cue, go to full throttle (Z) with the engine pointing forward against your motion. This kills most of the 1.7 km/s you are carrying, and takes most of your fuel: about 1.8 of the 2.4 km/s you have.
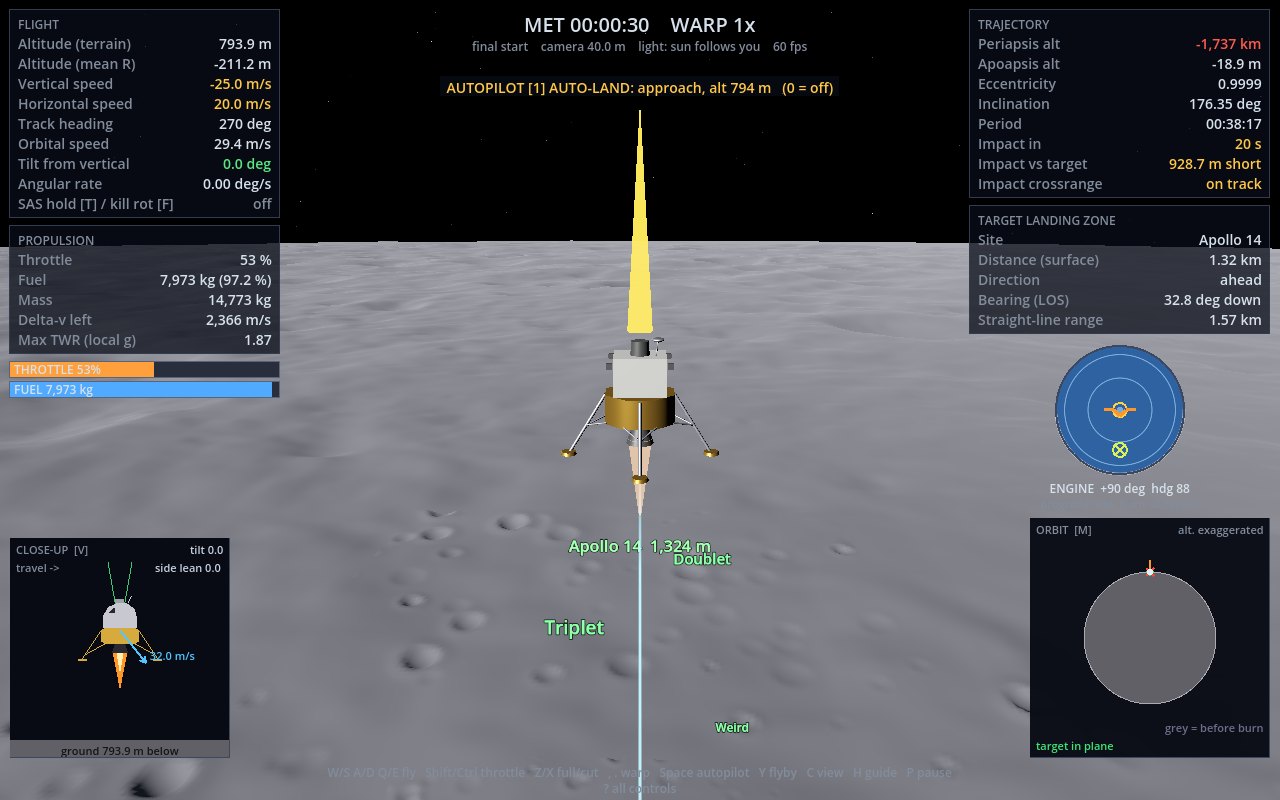
- Watch the impact marker. The orange cross on the ground and Impact vs target tell you if you will stop short or overshoot. Short? Ease off the throttle or pitch up a little. Long? Lean further back.
- Pitch up as you slow. Bring the LM toward upright. Below about 2 km you should be nearly vertical, coming down at 20–30 m/s, and still sliding toward the site.
- Null the drift, then settle. Over the site, lean slightly against the remaining horizontal speed. Then hover down: under 5 m/s below 100 m, under 2 m/s at the end.
What counts as a landing
| At touchdown | Limit | Why |
|---|---|---|
| Vertical speed | ≤ 2 m/s | The legs' crush limit |
| Horizontal speed (against the ground) | ≤ 1 m/s | Sliding catches a footpad and tips you over |
| Tilt from vertical | ≤ 10° | Same as the 2D game |
| Ground slope under the four pads | ≤ 12° | The LM's design limit. Steeper ground tips it over, however gently you land. |
| Rocks | none under the engine | The engine bell is 0.7 m above the footpads. A boulder that reaches it is a crash. |
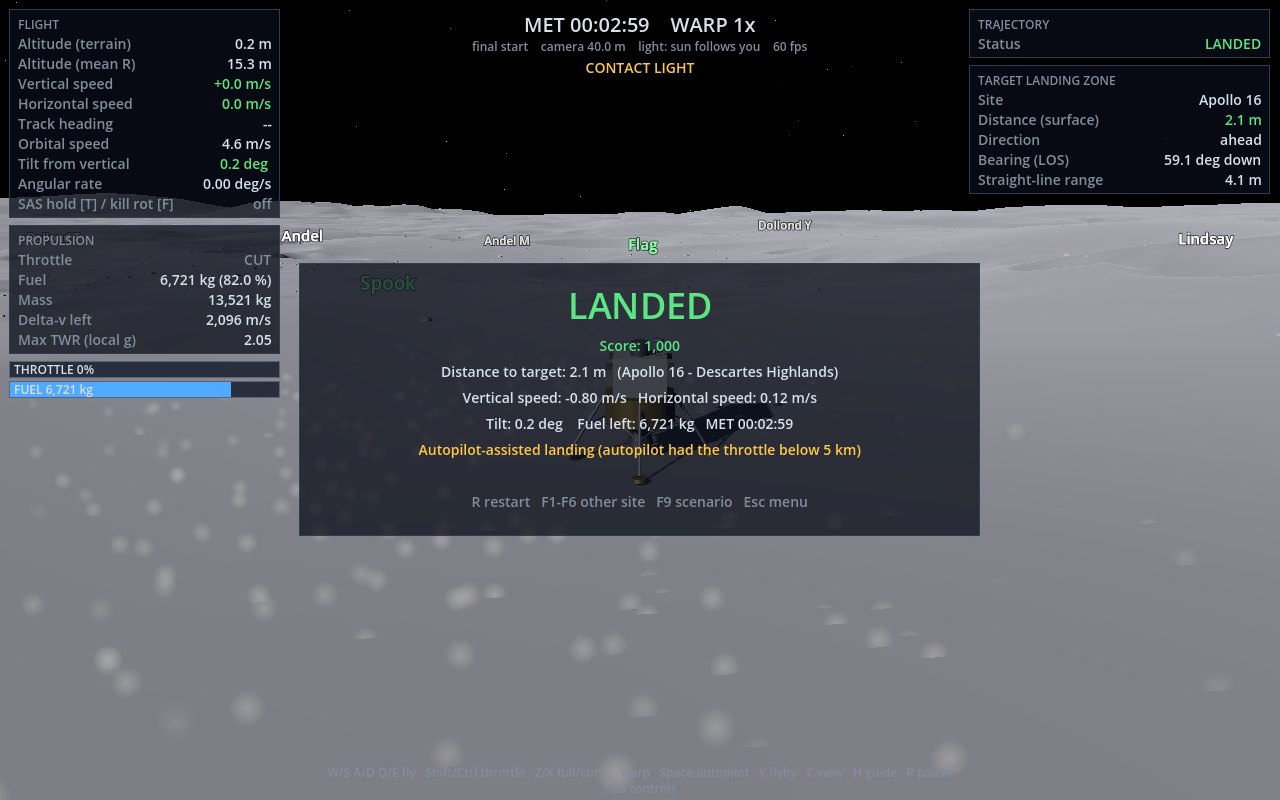
The score is 1000 / (1 + (d / 100 m)²), where d is your distance from the site: 1,000 on the
spot, 500 at 100 m, 200 at 200 m. The ground near each Apollo site (within 40 m) is kept smooth and free of rocks.
High scores. Every landing at a site goes on that site's list, kept apart for each start (powered descent, in orbit, final approach, custom orbit), since a landing from orbit is a much longer flight than the last 1.5 km. Each list keeps the top five: best score first, then most fuel left. The LANDED box tells you if it was a new best, which place it took, or the best you had to beat. To see the records, choose High scores on the main menu: it lists the best at every site for one start (press the start button to change it); highlight a site to see its top five from each start. Using the autopilot halves your score: engaging any program, even for a moment, marks the flight (the HUD's top line says autopilot used: score halved) and the landing scores half. Each entry is marked if the autopilot was used, the tanks were over-filled (fuel override) or a tanker topped you up, so you can tell a hand-flown record from a helped one. Crashes, and landings with no site set, aren't scored. On the landing-zone page, highlight a site (or point at it) and its high score from the start you picked shows under its description.
Look around. After a landing, press Enter (X, or Look around in the menu) to hide the results and every panel and take in the site: drag the mouse (or the right stick) to swing the camera round the LM, the wheel (D-pad up / down) to zoom, C (R3) to look out of the window, L for the lighting. Enter (A or B) brings the results back; Esc (Back) goes to the main menu.
Sounds that matter
CONTACT LIGHT chimes when the 1.7 m probes under the footpads touch: cut the engine. LOW LEVEL sounds at 5.6 % fuel, then 60 SECONDS and 30 SECONDS of hover fuel left. A warbling master alarm below 1 km means you are coming down faster than the engine could stop with a margin. Throttle up now.
6Cockpit view
C (R3) cycles chase → cockpit → docking (with a tanker near) → flyby → chase.
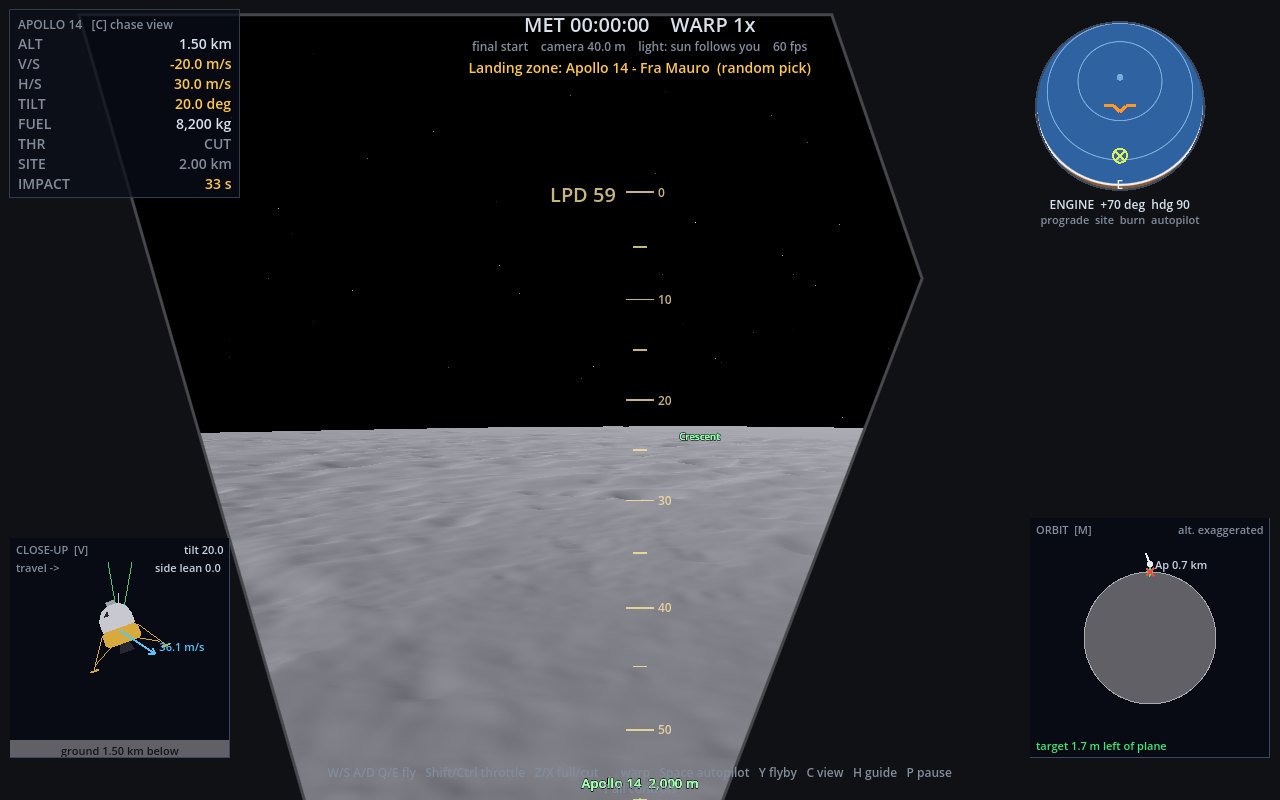
The scale etched down the window is the landing point designator (LPD), 0 to 55° below the line of sight. The green diamond shows where the site is through the window, and LPD 59 is the number the Apollo crews read off it: the site is 59° down. The compact panel at top left has what you need near the ground: altitude, speeds, tilt, fuel, distance to the site.
7Autopilot & guide
Space (Back) opens the pop-up menu. The autopilot flies like a player would, with the same jets and engine. Engaging any program halves the landing's score (see Landing).
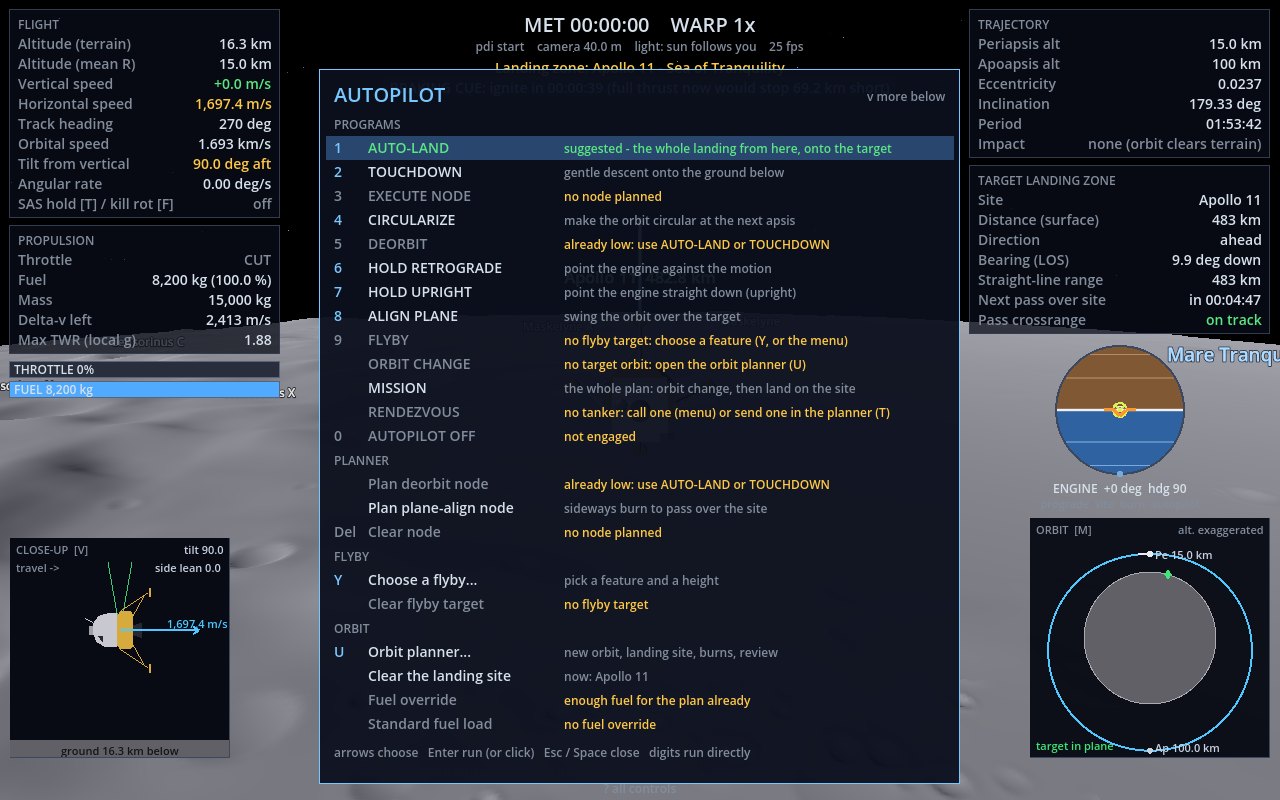
| # | Program | What it does |
|---|---|---|
| 1 | AUTO-LAND | The whole landing from here: plane alignment if needed, deorbit, braking, approach, touchdown. It lands within a few metres, and steps aside to clear ground if the site has a boulder. |
| 2 | TOUCHDOWN | A gentle descent onto whatever is below |
| 3 | EXECUTE NODE | Flies the maneuver node you planned (N) |
| 4 | CIRCULARIZE | Makes the orbit round at the next high or low point |
| 5 | DEORBIT | The retrograde burn that drops the far side of the orbit onto the site |
| 6 · 7 | HOLD RETROGRADE · UPRIGHT | Points the engine against the motion, or straight down |
| 8 | ALIGN PLANE | A sideways burn a quarter orbit before the pass, so the track crosses the site |
| 9 | FLYBY | Sightseeing: pick any named feature (Y) and a pass height |
| 10 | ORBIT CHANGE | Flies the planner's burns into a new orbit |
| 11 | MISSION | Orbit change, wait for the pass, land. With a tanker out, it refuels first. |
| 12 | RENDEZVOUS | Catches the tanker, docks, refuels, backs off |
Digits 1–9 run a program directly, and 0 turns the autopilot off. Programs 10–12 are run from the menu. Touch the rotation or throttle and you take over. Change the warp yourself, and the autopilot leaves the warp to you for the rest of that program.
8Choose your orbit
Start in any orbit you like, pick a site it can reach, and add one burn if you want.
On the landing-zone page, choose Choose your orbit. Before the flight starts, a globe of the Moon opens with three steps in the panel on the right. Everything is on the standard tanks: no tanker, no extra fuel.
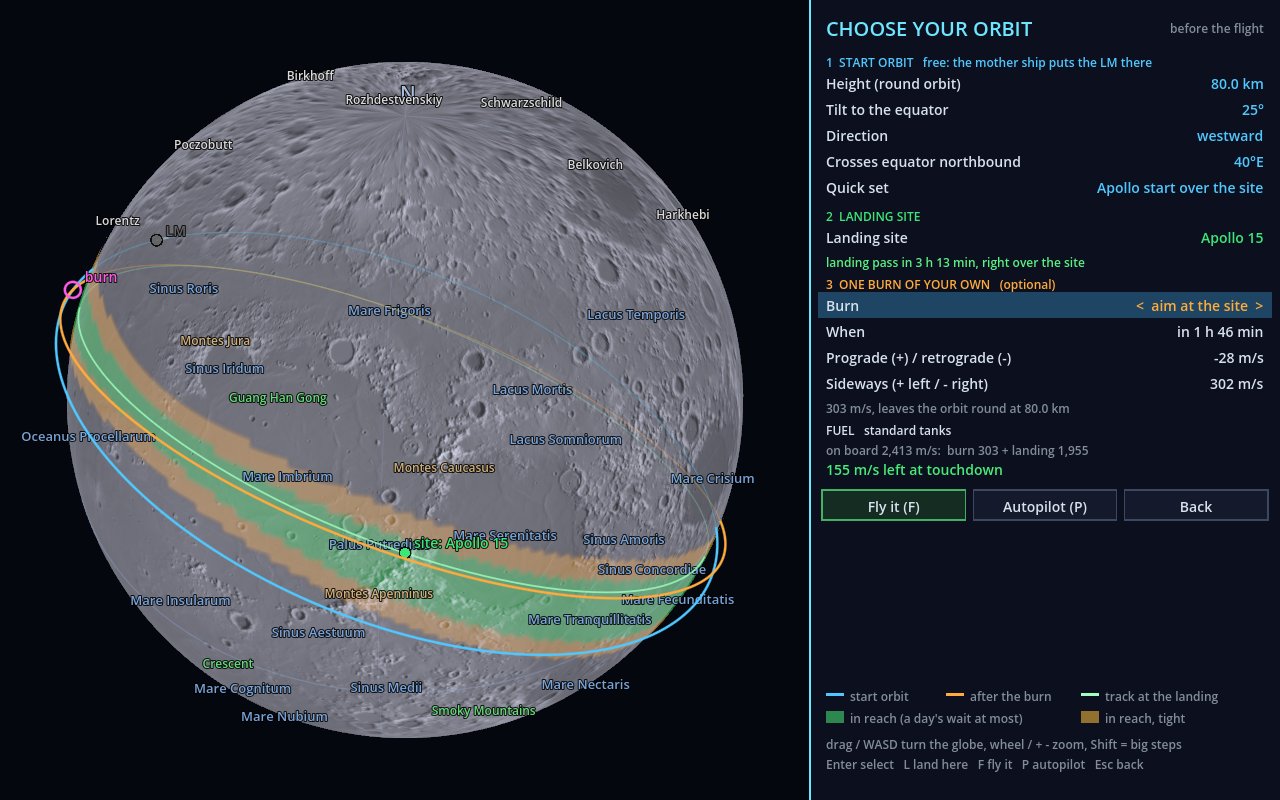
- Pick the start orbit. Height, tilt to the equator, direction and where it crosses the equator, or a quick set: the Apollo start over the site, over the landing site, equatorial, polar. You don't burn fuel for it. Turning an orbit in flight is what costs: about 28 m/s per degree, and the LM has only about 400 m/s to spare after a landing.
- Pick the landing site. Left/Right step through the Apollo sites, or put the crosshair on any spot and press L (X), or click the globe. Watch the shaded band: a site inside it can be reached on what you have. The band is wider than the orbit's track for two reasons. Waiting is free: the Moon turns about 1.1° under the orbit each lap, so over a day the track slides some 13° west. And a small sideways burn just before the landing can swing the orbit over a site that is off to the side.
- One burn of your own (optional). Aim at the site works out the sideways burn that puts the site right under the track, three quarters of a lap before the landing pass, so the deorbit comes after it. Your own lets you set when it fires and how much prograde and sideways. The band moves with it, so you can see the trade: spend fuel now, and the band moves over a site you want but gets thinner.
- Go. The panel shows when the landing pass comes and the fuel: the burn, the landing and what is left at touchdown. Fly it (F) starts with your burn planned as a maneuver node, and the deorbit and landing are yours (3 lets the autopilot fly the node). Autopilot (P, Start) flies the burn, waits for the pass and lands. The Sun will be up over the site when you get there.
Restarting (R) brings the setup back as you left it, so you can try again or change one thing. Landings at an Apollo site go on its custom orbit high-score list. If you need more than this (tankers, extra fuel, big orbit changes in flight), that's the orbit planner, next.
9The orbit planner
U: pause the flight and plan on a globe of the real Moon.
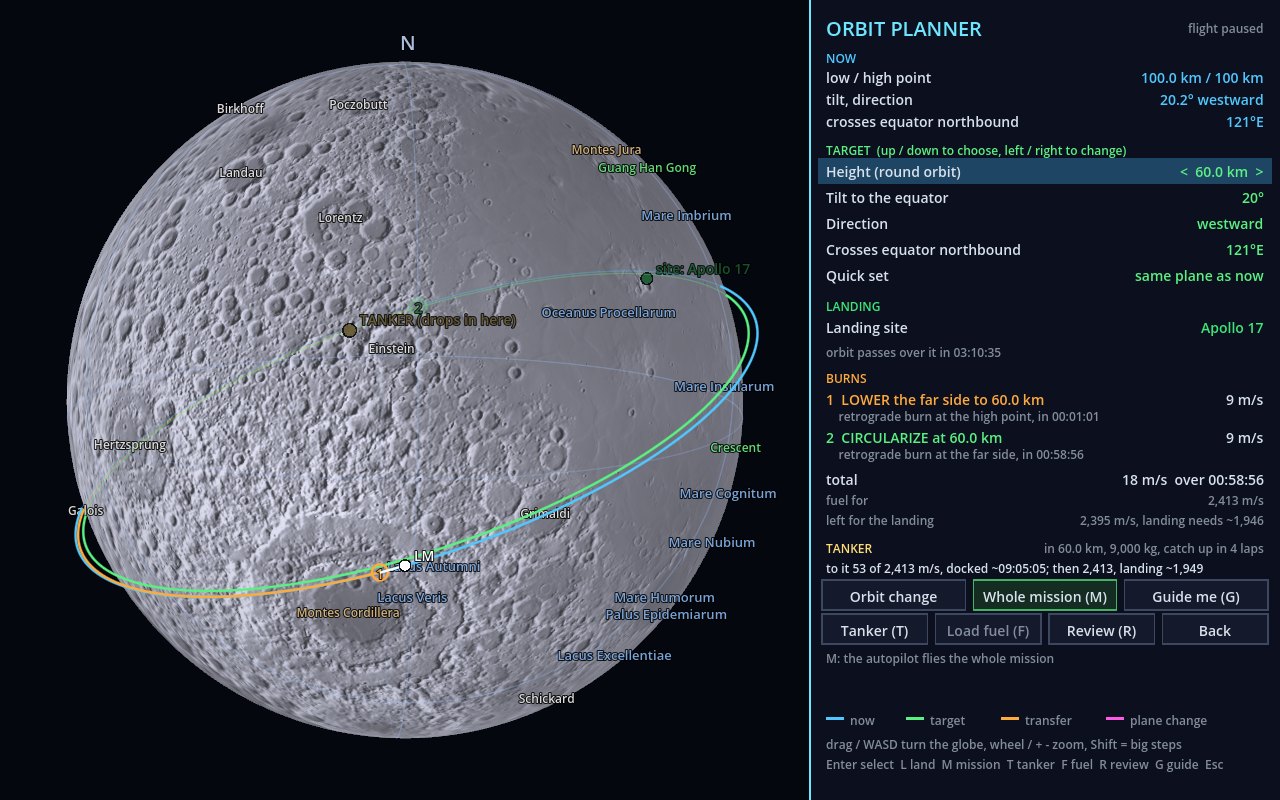
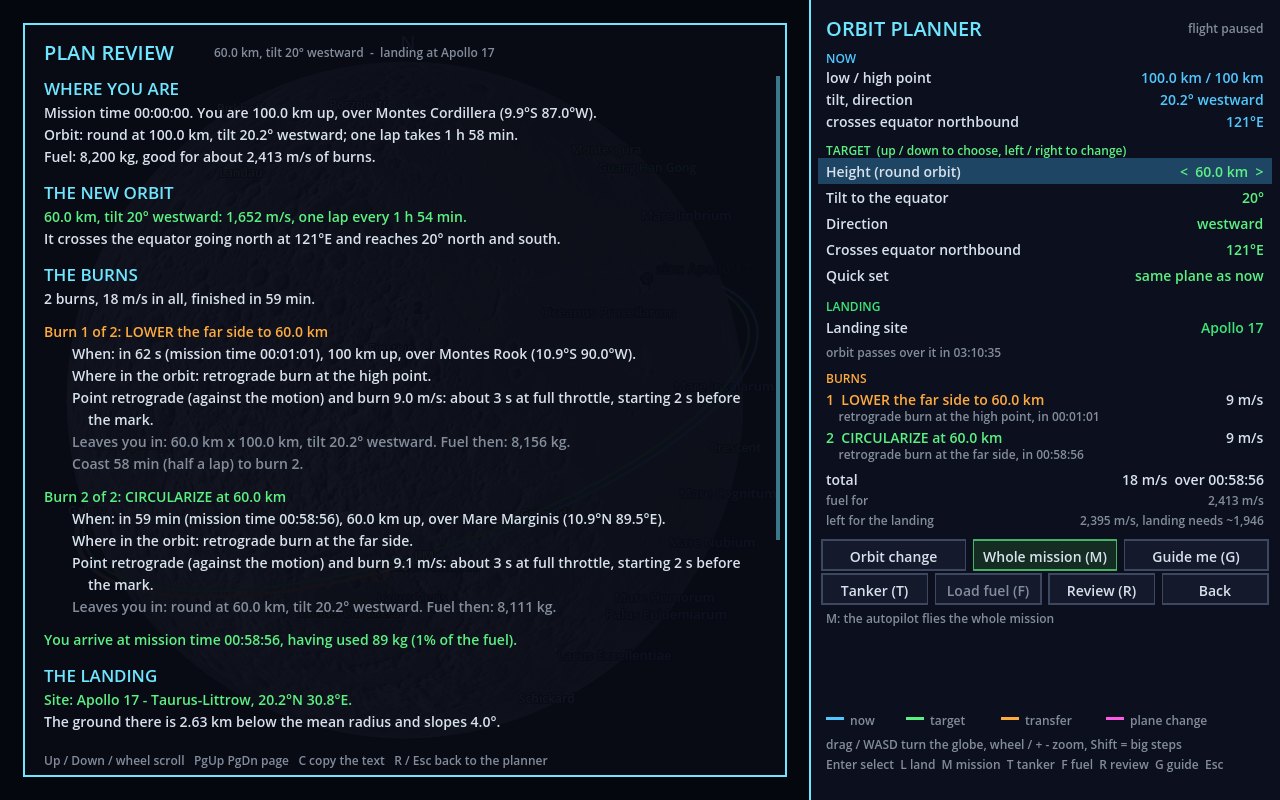
- Set a target orbit. Up/Down choose a row, and Left/Right change it: height (10–1,000 km), tilt to the equator, direction, and where it crosses the equator. Quick set has shortcuts: same plane as now, over the landing site, equatorial, polar.
- Read the burns. Each burn is listed with its delta-v (the change of speed it makes, in m/s) and time. Going down, any plane change comes first. Going up, it waits until the orbit is high, where turning the plane is cheaper. Plane changes are expensive: about 29 m/s per degree at that speed. Reversing direction costs twice your orbital speed and shows in red.
- Check the landing. The LANDING row says whether the new orbit passes over the site, and the fuel lines compare what is left with the landing's estimate. Drop a new site with L (at the crosshair) or a click on the globe.
- Watch it on the orbit map. Back in flight, the orbit map (bottom right) draws the plan live: each burn numbered, orange arcs from one burn to the next, and the new orbit in green. During a burn the label counts the delta-v still to go, and you can watch your cyan orbit close in on the orange.
- Fly it. Orbit change lets the autopilot fly the burns. Guide me (G) sets each burn up as a node for you to fly. Whole mission (M) does everything through to touchdown.
10Not enough fuel? The fuel override
Load the extra fuel the plan needs. The physics doesn't change: the fuel is real mass.
The 3,050 m/s below is the descent engine's exhaust velocity (a specific impulse, Isp, of 311 s), the number the rocket equation needs.
The LM carries 8,200 kg of fuel on a 6,800 kg dry mass. Through the rocket equation that's
3,050 m/s × ln(15,000 / 6,800) = 2,413 m/s of delta-v. A big plane change can need more than that.
Load fuel (F in the planner) runs the rocket equation backwards for the plan plus a 10 % margin,
and loads the result while you coast.
The fuel override is a sandbox shortcut. The honest way to get more fuel is the tanker.
11The refuel tanker
An uncrewed tank with 9,000 kg of fuel. Dock with it and fill up.
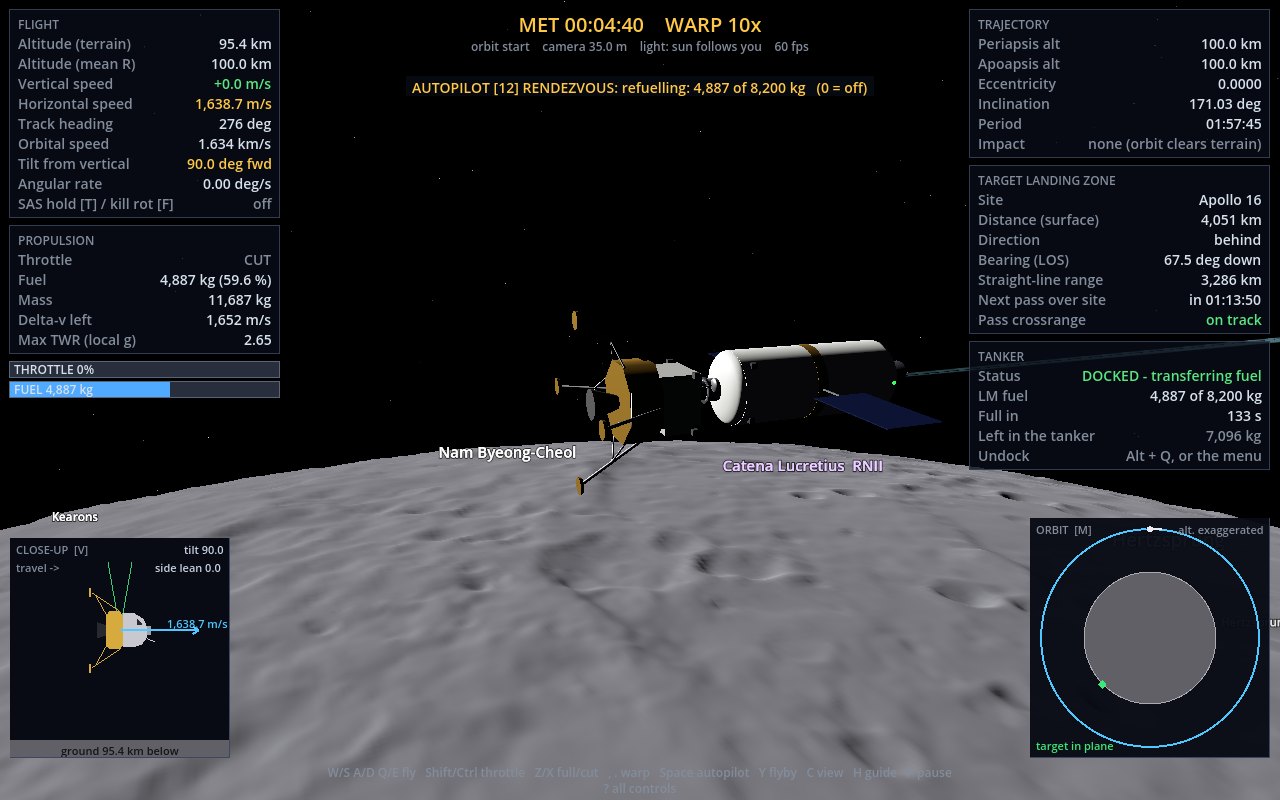
The tanker has a long white tank, solar wings and flashing beacons, and a black cross on a white disc marks its docking port. It coasts on its orbit, holding its attitude to the track with the port facing back along it, toward you.
Practice: call one to your orbit
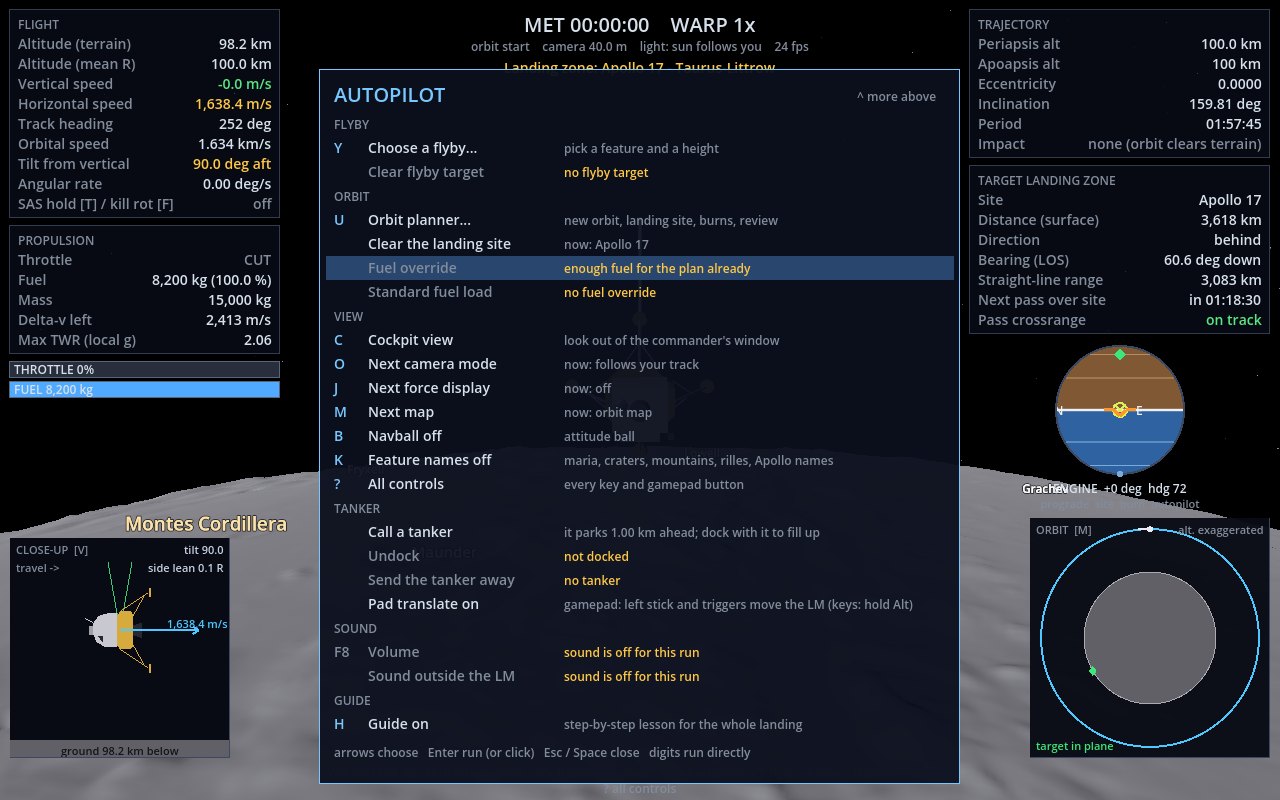
In the Space menu, TANKER section, choose Call a tanker. It parks 1 km ahead of you in the orbit you are in.
Moving sideways: translation
Hold Alt and the flying keys move the LM instead of turning it. Four 445 N jets fire in each direction, giving about 0.12 m/s² on a full LM, and they burn 0.63 kg of fuel per second of firing.
| Keys | Moves the LM | Gamepad (translate mode) |
|---|---|---|
| Alt+E / Alt+Q | up / down: up is toward the docking port on top of the LM. This is how you close in and back away. | RT / LT |
| Alt+W / Alt+S | forward / back | L-stick up / down |
| Alt+A / Alt+D | left / right | L-stick left / right |
On a gamepad, choose Pad translate on in the Back menu. The left stick and triggers then translate, and the right stick turns the LM.
The approach
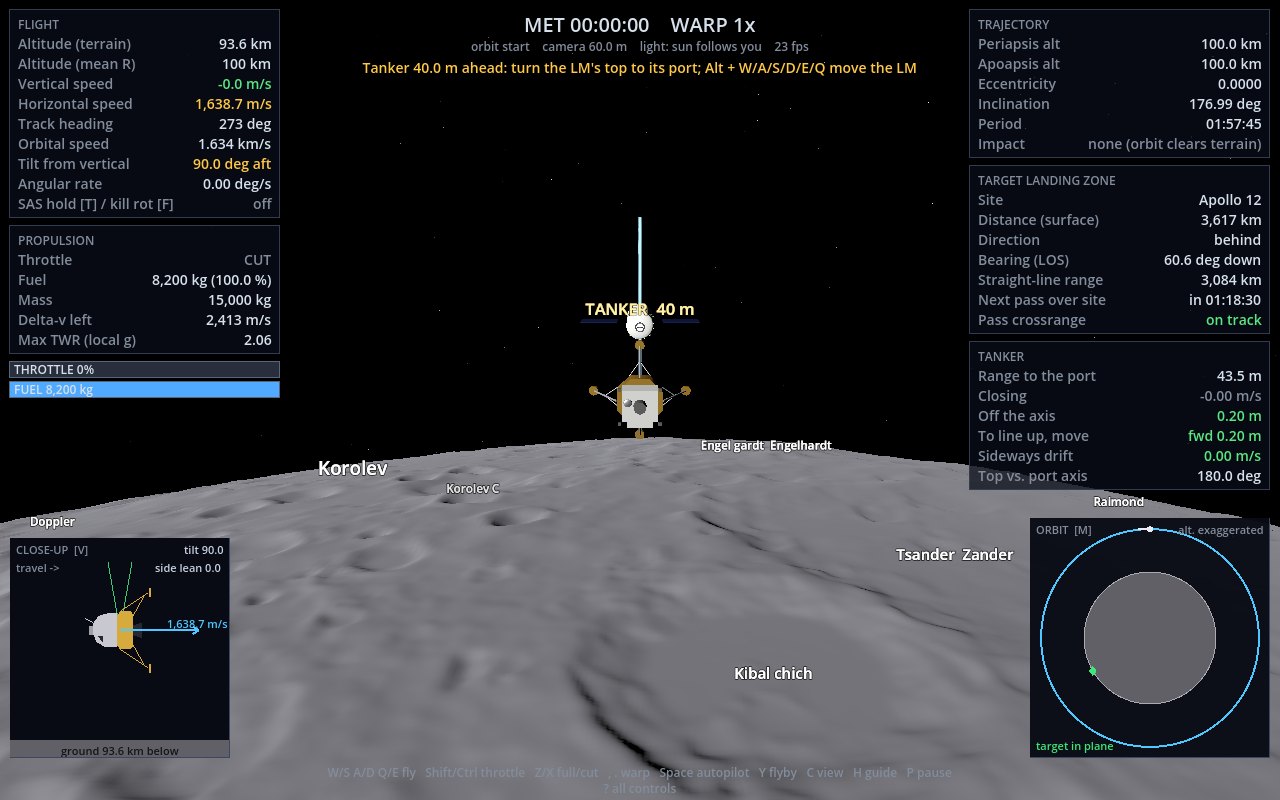
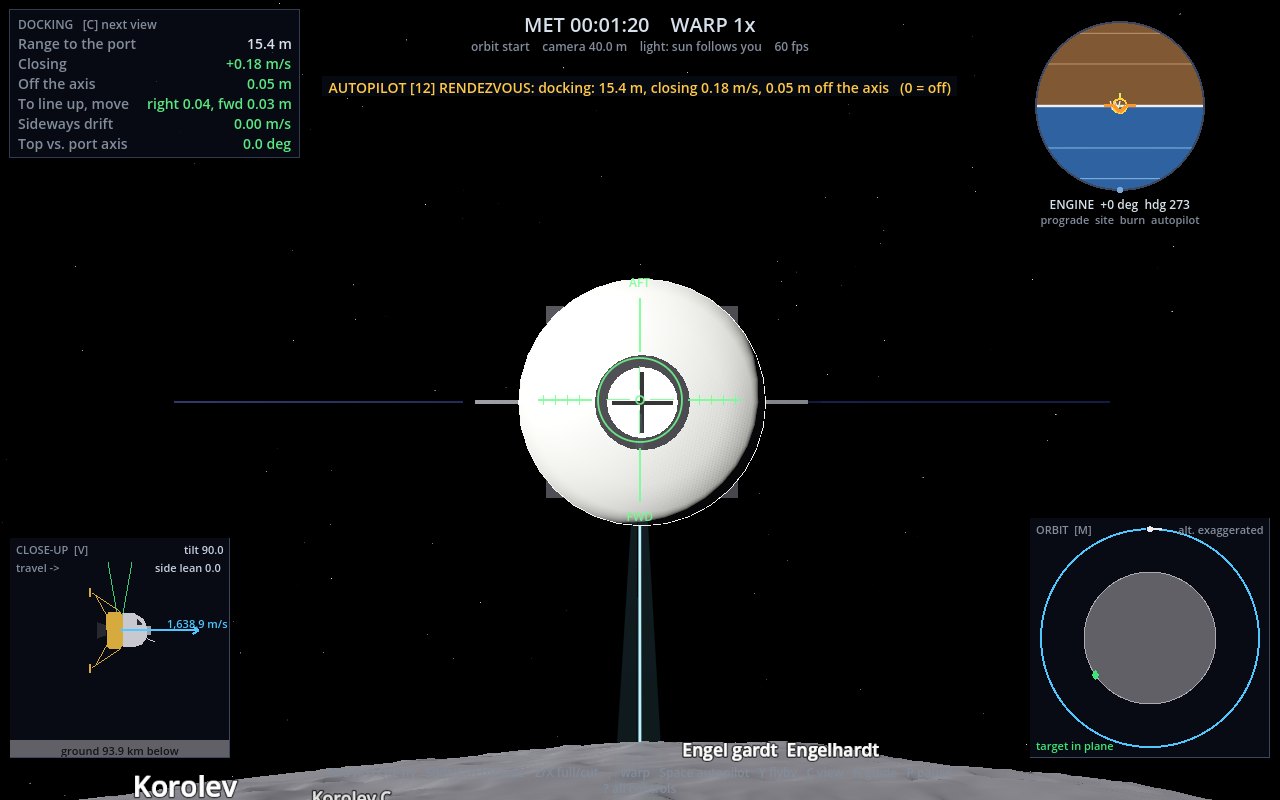
- Turn the top of the LM toward the port. The TANKER panel's Top vs. port axis should read 0° (it must be under 6° at contact). A freshly called tanker reads 180°: you start facing the wrong way, so turn the LM end over end.
- Line up. To line up, move tells you which way, in the LM's own directions ("right 0.40 m"), so it maps straight onto Alt+D. Null the Sideways drift afterwards with a tap the other way.
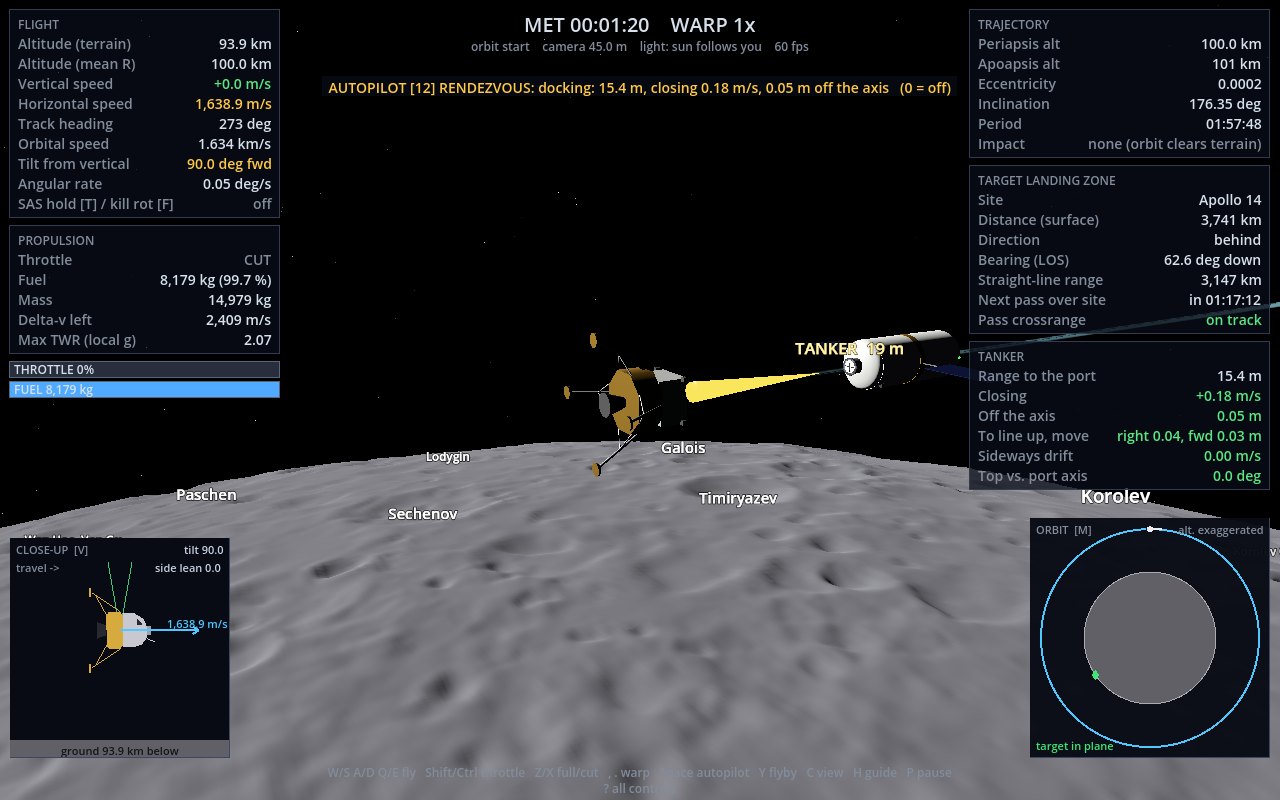
- Close in. Alt+E. You can go 1–2 m/s far out, but slow to under 0.3 m/s in the last 10 m (green = within the latch limits).
- Contact. The latches catch and the fuel starts to flow.
| At contact | Latch | Otherwise |
|---|---|---|
| Closing speed | ≤ 0.3 m/s | 0.3–0.6 bounces off · over 0.6 m/s is a crash |
| Sideways speed | ≤ 0.1 m/s | bounce |
| Off the port's centre | ≤ 0.3 m | bounce, or hitting the tank (a crash if fast) |
| Angle to the port's axis | ≤ 6° | bounce |
| Turning rate | ≤ 1°/s | bounce |
After a bounce, the message says what was wrong. Back off, line up again, and come in slower.
The docking view
With a tanker nearby, C adds a view straight up through the LM's docking window, as the commander saw it with their head tilted back. AFT is at the top and FWD at the bottom. Keep the black cross centred in the green ring as it grows.
12Docking trainer
Try it here first. This is the docking view with the game's latch rules and jet strength.
The trainer leaves out orbital drift and attitude. In the game, two craft a few metres apart drift slowly apart in orbit, and you must also hold the LM's top on the port axis (SAS helps).
13Rendezvous: sending a tanker
The real thing: the tanker goes into a refuel orbit and you have to catch it.
In the planner, set a target orbit and press Tanker (T). The tanker drops into that orbit 20° ahead of where your orbit change will put you, because launch windows never line up exactly. The plan then has three parts:
- Orbit change into the tanker's orbit, matched closely: within 300 m in height and 0.03° in plane. A kilometre of height difference becomes kilometres of drift every lap.
- Phasing. To catch up with something ahead of you in the same orbit, you slow down. A retrograde burn drops the far side, the shorter lap gains on the tanker, and after N laps a burn at the same point puts you back in its orbit, 1 km behind it. If the tanker is behind you, you go higher instead and let it come round.
- Approach on the translation jets, as in the trainer.
Let the autopilot do it: RENDEZVOUS (12)
Program 12 flies all of it: the orbit change, phasing (re-planned from where each burn really left you), the approach along the docking axis, docking, the transfer, undocking, and backing off 40 m. From 20° behind with 2,500 kg on board, it docks about four hours later having used 131 kg to get there.
A whole mission with a refuel stop
With a tanker out, MISSION (M in the planner) stops at the tanker first, then waits for the pass over the site and lands on full tanks. The planner's TANKER lines show the fuel to reach it and what is left for the landing.
14Quick reference
| Action | Keyboard | Gamepad |
|---|---|---|
| Pitch · yaw · roll | WS · AD · QE | L-stick · LB/RB · L-stick |
| Throttle up / down · full / cut | Shift Ctrl · Z X | RT / LT · A / B |
| Kill rotation · SAS (spin-up stick mode) | F · T | X · Y |
| Lock camera · axis gauges | ; · ' | L3 · Back menu |
| Time warp | , . (Alt+. with the engine lit) | D-pad left / right |
| Translate (docking) | Alt + WSADEQ | translate mode |
| Menu (autopilot, tanker, views) | Space | Back |
| Run program · off | 1–9 · 0 | Back menu |
| Choose your orbit (before the flight) | F fly it, P autopilot, L land at the crosshair, Esc back | Start autopilot, X land here, B back |
| Orbit planner | U (then M mission, G guide, T tanker, F fuel, R review) | Back menu |
| Maneuver node | N plan, arrows / PgUpPgDn / HomeEnd shape, Del clear | Back menu |
| Flyby picker | Y | Back menu |
| Guide · show me · next · back | H · G · Tab · ` | Back menu |
| View: chase / cockpit / docking / flyby | C | R3 |
| Camera orbit · zoom | mouse drag · wheel | R-stick · D-pad up/down |
| Map · navball · names · close-up | M · B · K · V | Back menu |
| Lighting · sound volume | L · F8 | Y paused · Back menu |
| Pause · restart · all controls | P · R · ? | Start · A after landing · X paused |
| Look around after a landing | Enter | X |
| Site · start | F1–F6, F7 random · F9 | – |
Good luck, and watch the fuel.
15Appendix
Glossary, credits and references.
14.1 Glossary
- Apoapsis
- The highest point of an orbit (periapsis is the lowest). The TRAJECTORY panel shows both.
- Attitude
- Which way the LM points. You change it with the RCS jets.
- Braking cue
- The HUD's countdown to the moment to light the engine for the braking burn.
- Chase view
- The camera behind and above the LM. C switches to the cockpit, docking and flyby views.
- Contact light
- The light (and chime) when the 1.7 m probes under the footpads touch the ground: cut the engine.
- Crossrange
- How far to the side of your ground track the site will pass.
- Delta-v (Δv)
- A change of speed, in m/s. Every burn costs some, and the fuel in the tanks is a budget of it.
- Deorbit burn
- The retrograde burn that lowers the far side of the orbit onto the landing site.
- Docking
- Joining two craft port to port. The latches catch only on a slow, lined-up contact.
- Exhaust velocity also specific impulse (Isp)
- How fast the engine throws its exhaust out: 3,050 m/s for the descent engine (Isp 311 s). It sets how much delta-v each kilogram of fuel buys.
- HUD heads-up display
- The panels drawn over the view: FLIGHT, PROPULSION, TRAJECTORY, TARGET LANDING ZONE and the rest.
- IAU International Astronomical Union
- The body that names features on the Moon and planets.
- Inclination tilt
- The angle between the orbit and the Moon's equator. The planner calls it tilt.
- Kepler orbit
- The path a body follows under one planet's gravity alone. The game computes it exactly, so coasting never drifts.
- LM Lunar Module
- The Apollo lander: a descent stage with the landing engine and legs, and an ascent stage with the crew cabin.
- LOLA Lunar Orbiter Laser Altimeter
- The laser on NASA's Lunar Reconnaissance Orbiter that measured the Moon's heights. The source of the game's terrain.
- LOW LEVEL
- The fuel warning at 5.6 % of the tanks, about two minutes of hovering.
- LPD landing point designator
- The angle scale on the LM's window. The crew read the site's angle off it.
- LRO Lunar Reconnaissance Orbiter
- The NASA spacecraft that has mapped the Moon since 2009.
- Maneuver node
- A planned burn: when, and how much prograde, normal and radial. N plans one.
- Mare plural maria
- A dark lava plain, such as the Sea of Tranquility (Mare Tranquillitatis), where Apollo 11 landed.
- Master alarm
- The warbling tone below 1 km when you are coming down faster than the engine could stop with a margin.
- MET mission elapsed time
- The clock at the top of the screen, counting from the start of the flight.
- Navball
- The attitude ball: sky and ground around the LM, with markers for prograde, the site and burns.
- Normal / anti-normal
- Sideways to the orbit. A normal burn turns the orbit's plane.
- Periapsis
- The lowest point of an orbit. If it is below the ground, the HUD shows the impact.
- Phasing
- Spending a few laps on a slightly faster or slower orbit to catch up with, or wait for, another craft in the same orbit.
- Plane change
- A sideways (normal) burn that tilts or swings the orbit. Expensive: about 29 m/s per degree at these heights.
- PDI Powered Descent Initiation
- The moment the descent engine lights for the landing, and the name of the default start (pdi).
- Port docking port
- The docking hatch on top of the LM, and the matching one at the front of the tanker, facing back along its track.
- Prograde / retrograde
- Along / against your direction of motion. Prograde burns raise the far side of the orbit, retrograde burns lower it.
- Radial
- Toward or away from the Moon's centre, square to the motion.
- Rate command
- The default stick mode: how far you push sets how fast the LM turns; centred, it stops and holds. The real LM's hand controller worked this way.
- RCS reaction control system
- The small thrusters that turn the LM and, while you hold Alt, move it sideways.
- Rendezvous
- Bringing two spacecraft together in orbit: the same orbit, the same place, at the same time.
- Rocket equation
- Δv = ve · ln(full mass / empty mass), from Tsiolkovsky. The basis of the fuel override.
- SAS stability augmentation system
- Damps the turning in the spin-up stick mode (T). In the default stick mode the LM already holds its attitude when you let go.
- SLDEM2015
- A Moon elevation model that merges LOLA with stereo images from Japan's SELENE (Kaguya) orbiter, 59 m per pixel near the Apollo sites.
- Time warp
- Running the simulation faster than real time. The physics steps stay the same size, so warp never changes the result.
- Translation
- Moving the LM sideways, up or down without turning it, for docking.
- TWR thrust-to-weight ratio
- The engine's push divided by the LM's weight. Above 1 it can climb, below 1 it can't hover.
14.2 Moon data
- Smith, D. E., et al. (2010). Initial observations from the Lunar Orbiter Laser Altimeter (LOLA). Geophysical Research Letters, 37, L18204. The game's global terrain is the LOLA gridded data record LDEM_16 (16 pixels per degree, about 1.9 km), from NASA's Planetary Data System (PDS) Geosciences Node: pds-geosciences.wustl.edu.
- Barker, M. K., Mazarico, E., Neumann, G. A., Zuber, M. T., Haruyama, J., & Smith, D. E. (2016). A new lunar digital elevation model from the Lunar Orbiter Laser Altimeter and SELENE Terrain Camera. Icarus, 273, 346–355. SLDEM2015, the 59 m-per-pixel detail around the six Apollo sites, from the same PDS node.
- Gazetteer of Planetary Nomenclature. International Astronomical Union (IAU) Working Group for Planetary System Nomenclature, and the U.S. Geological Survey (USGS) Astrogeology Science Center. The 9,087 feature names shown in flight: planetarynames.wr.usgs.gov.
- Wright, E. (2019). CGI Moon Kit. NASA Scientific Visualization Studio (SVS), item 4720. Optional colour map from the Lunar Reconnaissance Orbiter Camera's Wide Angle Camera (LROC WAC): svs.gsfc.nasa.gov/4720.
14.3 Software
- Godot Engine 4.7, .NET edition. Juan Linietsky, Ariel Manzur and the Godot contributors. MIT license. Rendering (Forward+ on Vulkan), input, audio and the scene tree: godotengine.org.
- .NET 10 and C#. Microsoft and the .NET Foundation. MIT license. The language of the game and its physics, with xUnit for the tests: dotnet.microsoft.com.
- pygame-ce and NumPy. The original 2D game in Python, which the Godot version ported and extended: pyga.me, numpy.org.
14.4 Further reading
- Jones, E. M., & Glover, K. (eds.). Apollo Lunar Surface Journal. NASA. Annotated transcripts of every landing, including the callouts the game borrows ("contact light", "60 seconds"): nasa.gov/history/alsj.
- Curtis, H. D. Orbital Mechanics for Engineering Students. Butterworth-Heinemann. Kepler orbits, orbit changes, plane changes and phasing maneuvers, as used by the planner and the rendezvous.
- Clohessy, W. H., & Wiltshire, R. S. (1960). Terminal guidance system for satellite rendezvous. Journal of the Aerospace Sciences, 27(9), 653–658. The classic account of how two nearby craft drift relative to each other in orbit: the drift the docking trainer leaves out.
14.5 Made with
- Game design, direction and testing: bos.
- Code, physics, this tutorial and its interactive pieces: written with Claude Opus 5.5 (Anthropic), working in Claude Code. anthropic.com/claude · claude.com/claude-code
The Apollo missions, NASA, JAXA and the data teams above are credited for their work. They do not endorse this game.